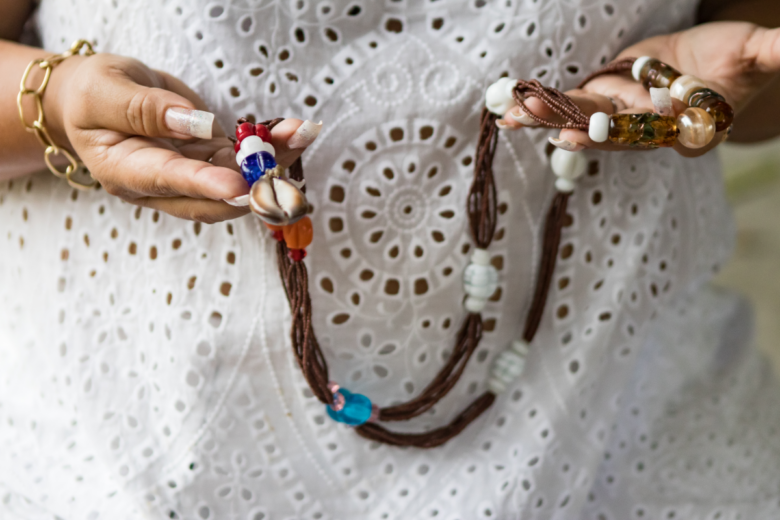
Handmade jewelry is not only a form of self-expression but also a creative journey that allows you to craft unique pieces that tell your story. Whether you’re looking to create a personalized gift for a loved one or simply indulge in the joy of making something beautiful for yourself, the world of artisanal jewelry is filled with endless possibilities.
For beginners, the process may seem daunting, but it’s surprisingly accessible once you understand the basic tools and techniques involved. Handmade jewelry allows you to explore different materials, colors, and styles, giving you the freedom to experiment and design exactly what you envision. From simple bead necklaces to intricate designs with metalwork, the possibilities are limitless.
In this guide, we’ll walk you through each step of creating your very own handmade necklace, offering tips, tricks, and advice to help you succeed. Whether you’re crafting your first necklace or refining your technique, this journey into the world of handmade jewelry promises to be both fun and rewarding. Let’s get started!
Materials Needed to Make Your First Handmade Necklace
Before diving into the creation of your handmade necklace, it’s essential to gather all the necessary materials. The right tools and supplies will ensure that your project goes smoothly and results in a beautiful, durable piece of jewelry. Here’s a list of the basic materials you’ll need:
- Beads: Beads are the foundation of most necklaces. You can choose from a variety of shapes, sizes, and materials, such as glass, wood, metal, or natural stones. The type of bead you choose will set the tone for your design.
- Stringing Material: The material you use to string the beads is crucial. Common options include nylon thread, wire, and elastic cord. Nylon thread offers flexibility, while wire is more durable and secure.
- Clasps: A clasp is necessary to close your necklace and keep it secure. The most common types are lobster clasps, magnetic clasps, and toggle clasps.
- Crimp Beads: These are small metal beads used to secure the ends of your stringing material and hold the clasp in place.
- Needle: A jewelry-making needle, typically used for threading beads, helps guide your string through small bead holes.
- Scissors or Jewelry Cutter: For cutting your stringing material to the desired length.
- Pliers: Pliers are used to bend wire, tighten crimp beads, and open/close jump rings for attaching pendants or clasps.
- Jump Rings (optional): Small rings that connect different components of your necklace, such as a pendant or charms.
Choosing the Necklace Design: Simple or Elaborate?
When designing your first handmade necklace, it’s essential to decide whether you want a simple or more intricate piece. Both designs can be stunning, but your choice depends on the occasion, your skill level, and the materials available.
- Simple Design: If you’re just starting, it’s best to start with a straightforward design. A basic bead necklace with a few colors or a simple charm is easy to make and looks elegant. Choose a single strand of beads or a pendant as the focal point.
- Elaborate Design: As you gain confidence, you can start experimenting with more intricate designs. This could involve layering beads, creating patterns, or adding more elements like charms, pendants, and intricate wirework. Remember, the more components you add, the more time and skill it will take to complete.
Step 1: Selecting Beads and Pendants
The first step in assembling your necklace is selecting the beads and pendants that will make up your design. This is where your creativity truly shines!
- Beads: Select beads that complement each other in color, size, and shape. You can choose a matching set for a coordinated look or mix different types for a more eclectic style. For beginners, it’s helpful to choose beads with large holes and a uniform size to make the threading process easier.
- Pendants and Charms: Pendants and charms add a personal touch to your necklace. Choose a focal pendant that speaks to your style or the theme of the necklace. Charms can also be added to enhance the design. If you’re using metal components, ensure they match the finish of your beads (e.g., gold with gold, silver with silver).
Step 2: Assembling the Necklace – How to Position the Elements
Once you have your materials ready, it’s time to assemble your necklace. Here’s how to position your elements to create a balanced design:
- Lay Out the Design: Before stringing the beads, lay them out in the order you want them to appear on your necklace. This allows you to experiment with different arrangements and ensures that you’re satisfied with the look before you start.
- Symmetry vs. Asymmetry: You can opt for a symmetrical design (where beads are arranged in equal patterns on both sides of the pendant) or an asymmetrical one (where the design is intentionally uneven for a more dynamic look).
- Spacing: Consider leaving small gaps between beads for a light, airy look, or cluster the beads together for a bolder, statement design. Use crimp beads between certain elements to prevent them from sliding around on the string.
Step 3: Closure Techniques for a Secure and Durable Necklace
The final step in making your necklace is ensuring that it is securely closed so it can be worn without worry. Here’s how to properly close your necklace:
- Attaching the Clasp: Thread your stringing material through the clasp, and secure it using a crimp bead. Once the clasp is in place, squeeze the crimp bead with pliers to hold the clasp firmly. For wire-based necklaces, use crimp beads to attach the clasp ends to the wire.
- Securing the Ends: Make sure the stringing material is tightly secured at both ends. Trim any excess string with scissors or jewelry cutters. For extra durability, you can add a second crimp bead to reinforce the closure.
Tips for Personalization: Adding Your Unique Touch
One of the most exciting aspects of making a handmade necklace is the opportunity to infuse it with your personal style. Here are a few ways you can make your necklace unique:
- Use Unique Beads or Materials: Explore different types of beads such as wooden beads, crystal beads, or even recycled materials. These can give your design a one-of-a-kind look.
- Add Meaningful Charms or Pendants: Consider using charms that represent something meaningful to you, such as a lucky symbol, birthstone, or a charm that symbolizes a specific event or interest.
- Color Palettes: Choose a color scheme that reflects your personal taste. You could use your favorite colors, or match the necklace to a particular outfit or occasion.
Common Mistakes and How to Avoid Them
When making a handmade necklace, it’s normal to make a few mistakes, especially as a beginner. Here are some common errors and tips on how to avoid them:
- Using Too Much Stringing Material: If you leave too much excess stringing material, it can make the necklace look messy. Measure carefully and cut only a little more than needed.
- Not Testing the Length: Before closing the necklace, always try it on or measure it against your neck to ensure it’s the correct length.
- Weak Closure: If the clasp isn’t attached securely, your necklace might come apart. Double-check the clasp before finishing the project, and ensure the crimp beads are tightly squeezed.
How to Care for and Maintain Your Handmade Necklace
Taking care of your handmade necklace will ensure it remains in excellent condition for years to come. Here’s how to keep it looking its best:
- Avoid Exposure to Harsh Chemicals: Keep your necklace away from perfumes, lotions, and cleaning products, as these can damage beads and tarnish metal components.
- Store Properly: Store your necklace in a jewelry box or a fabric pouch to prevent tangling or scratching.
- Clean Gently: Clean your necklace with a soft cloth to remove dust and oils. For more delicate materials, use a specialized cleaning solution for beads or metal.
With these tips, your handmade necklace will not only look stunning but last for years to come!
Transforming Creativity into Wearable Art
Creating a handmade necklace is more than just assembling beads and stringing them together—it’s an expression of your creativity and personal style. Throughout this guide, we’ve explored the essential materials, design choices, and techniques to help you make a necklace that is both beautiful and unique. Whether you opted for a simple design or an intricate masterpiece, the process of crafting your own jewelry is an immensely rewarding experience.
By choosing your materials thoughtfully, experimenting with different designs, and mastering the basic techniques, you’ve turned a creative idea into a wearable work of art. Each handmade necklace you create can tell a story, whether it’s a gift for a loved one, a personal statement, or an accessory that perfectly complements your wardrobe. The possibilities are endless as you continue to refine your skills and push the boundaries of your designs.
Remember, the key to making a beautiful handmade necklace lies in embracing your creativity, experimenting with new ideas, and having fun in the process. With practice, you’ll not only develop a keen eye for design but also gain confidence in creating pieces that are truly your own.
So, whether you’re making your first necklace or refining your craft, enjoy the journey of turning your imagination into a piece of art that can be worn and cherished for years to come. Let your creativity shine and continue to create beautiful, unique jewelry that reflects who you are!


